These are instructions for creating a new order form or price list or editing an existing one. Once created, order forms and price lists are available for use in the Company, Sales Rep, and Customer Portal views.
What’s the difference between an order form and a price list?
Order forms and price lists look almost identical. The major difference between an order form and a price list is that you can’t place an order from a price list. Price lists are mostly used when the ordering feature is not used. Order forms can display header and column elements that correspond to header and column elements on QuickBooks transactions. Price lists can display column elements that correspond to column elements on QuickBooks transactions.
Jump to Section
CREATE ORDER FORM
- Go to Orders > Manage List and Forms > New List/Form (or) Edit to edit an existing list or form. If you are editing an existing list or form, skip steps 2-4.
- Check the For Sale column on all items that you would like to appear on the list or form. The following QuickBooks item types can be displayed on lists and forms: Inventory, Non-Inventory, Assembly, Service, Other, and Group items.
- Once you have made your item selections, click Review Marked Items (items can be added or removed in a later step).
- Click Save as Price List or Save as Order Form. You can change any list or form’s usage to both price list and order form in a later step. Once you click Save, you will see the Create Order Form/Price List settings page.
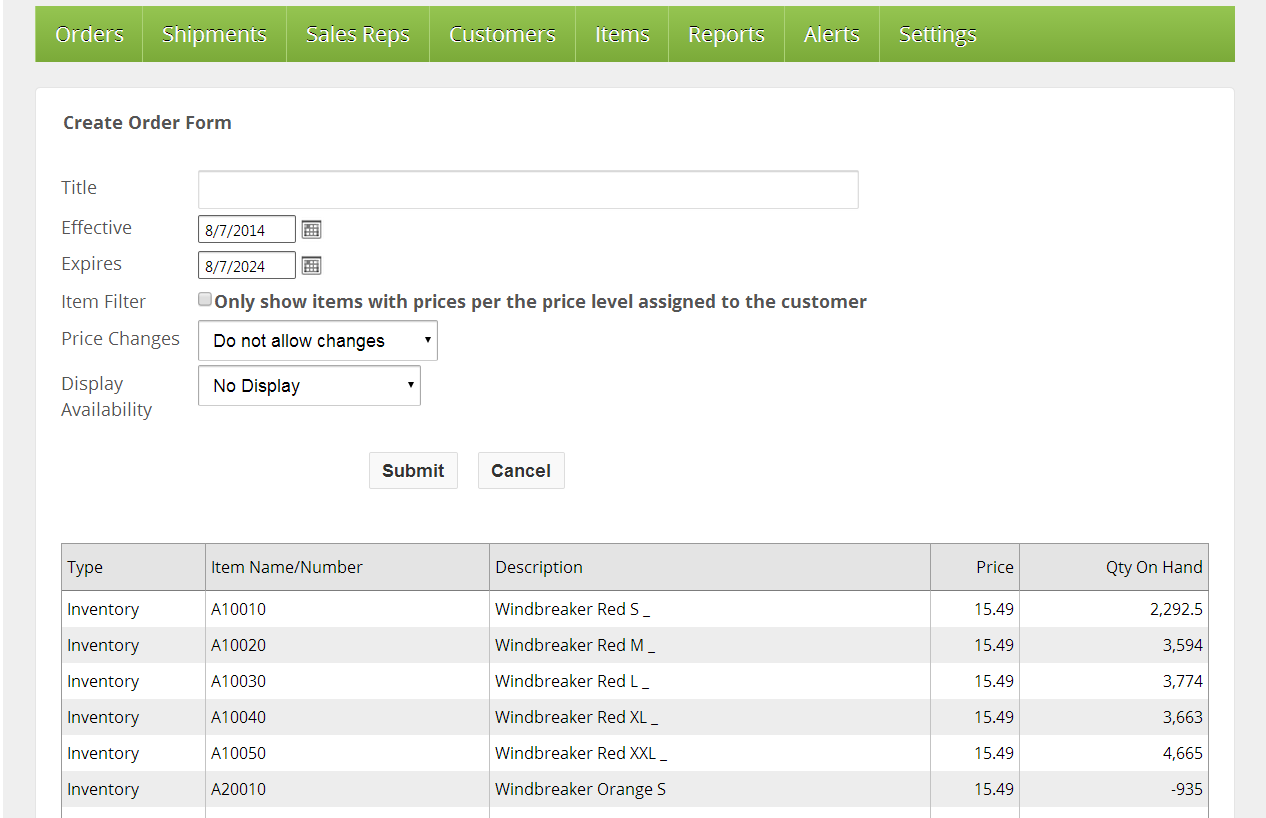
Create Order Form/Price List settings page
Title
Enter a name for the list or form. This name will be visible to portal users authorized to view this list or form.
Effective
Open the calendar popup and select the date that you want this list or form to be visible to portal users.
Expires
Open the calendar popup and select the date that you want this list or form to no longer be visible to portal users.
Item Filter
The item filter only applies if QuickBooks price levels are in use.
Item Filter Unchecked
- If the selected customer does not have a QuickBooks price level, the list or form will display all items selected and the prices displayed will be the sales price from the QuickBooks item list.
- If the selected customer has a fixed-percentage price level, the list or form will display all items selected and the prices displayed will be the customer’s fixed-percentage price level price.
- If the selected customer has a per-item price level, the list or form will display all items selected and the prices displayed will be the prices in the “Custom Price” column on the customer’s per-item price level. All items without a price in the customer’s “Custom Price” column on the customer’s per-item price level will display the sales price from the QuickBooks item list.
Item Filter Checked
- If the selected customer does not have a QuickBooks price level, the list or form will display all items selected and the prices displayed will be the sales price from the QuickBooks item list.
- If the selected customer has a fixed-percentage price level, the list or form will display all items selected and the prices displayed will be the customer’s fixed-percentage price level price.
- If the selected customer has a per-item price level, the list or form will display all items selected only if the item’s price is listed in the “Custom Price” column on the customer’s per-item price level. The prices displayed will be the prices in the “Custom Price” column on the customer’s per-item price level. If an item’s price is not listed in the “Custom Price” column on the customer’s per-item price level, the item will not be displayed on the list or form.
Price Changes
Price changes do not apply to price lists. The ability to change prices on the order form is available in the Company and Sales Rep Portals. It is not available in the Customer Portal.
- Do not allow changes will prevent users from editing prices.
- Edit prices allows users to change prices on the form on a per-order basis.
- Select from price levels allows users to change prices on the order form on a per-order basis, but changes are limited to the predefined QuickBooks price level prices.
Display Availability
This information comes from the inventory values for each item from the QuickBooks item list. It is updated every time the QuickBooks Web Connector synchronizes.
- Do Not Display does not display any inventory values or statuses.
- Display Status Only does not display any inventory values but will display the following stock statuses: In Stock, Out of Stock, or On Order.
- Display Qty and Status will display the actual inventory value and will display the following stock statuses: In Stock, Out of Stock, or On Order.
When you have completed your selections, click Submit. You will then see the Edit Form screen containing 5 tabs: Settings, Items, Categories, Images, and Export and Import. The Settings tab of the order form editor will give you additional options at this time for usage, displaying availability, and form validation.
SETTINGS TAB
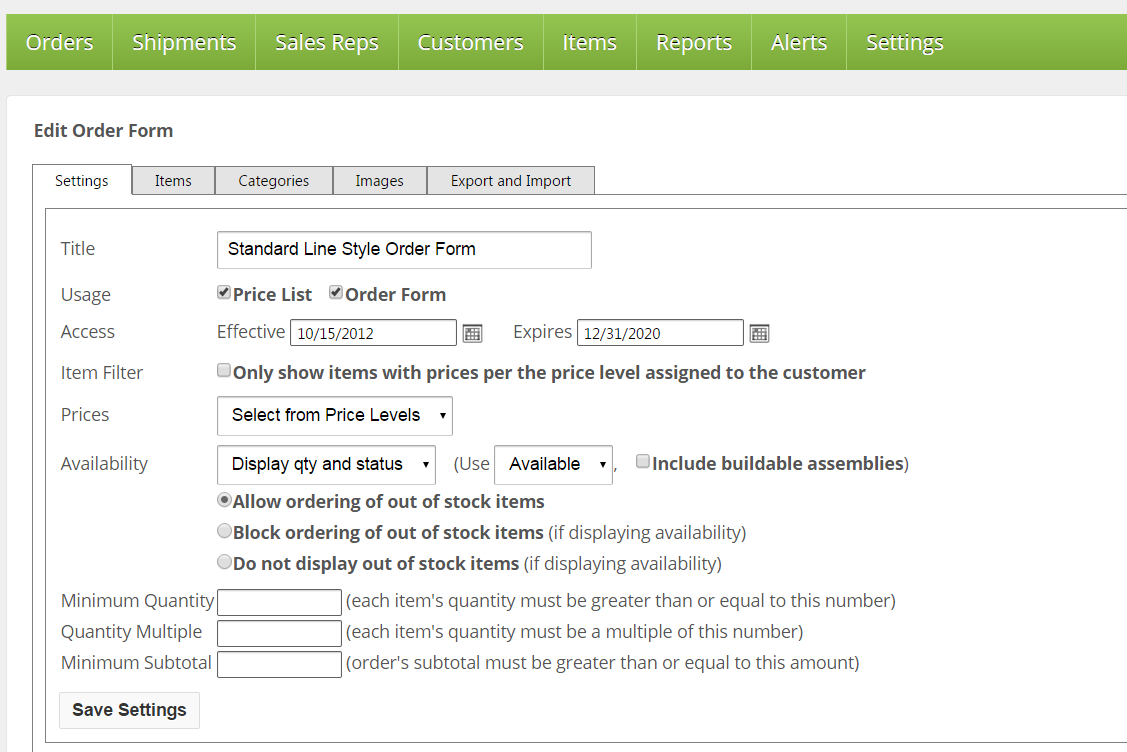
Usage
Even though you originally clicked Save as Price List or Save as Order Form, you can now set the usage to both a price list and order form if you wish.
Display Availability Cont’d.
- No Display does not display any inventory values or statuses.
- Display Status Only does not display any inventory values but will display the following stock statuses. In Stock, Out of Stock, or On Order. Use Available will show In Stock (if On Hand – On Sales Order > 0), Out of Stock (if On Hand – On Sales Order < 1), and On Order (if On Hand – On Sales Order < 1 and On P.O. > 1). Use On Hand will show In Stock (if On Hand > 0), Out of Stock (if On Hand < 1), and On Order (if On Hand < 1 and On P.O. > 1). Include buildable assemblies will show the number of assemblies that are built and/or can be built based on the availability of the individual components.
- Display Qty and Status will display the actual inventory value along with the stock status. Use Available will show In Stock (if On Hand – On Sales Order > 0), Out of Stock (if On Hand – On Sales Order < 1), and On Order (if On Hand – On Sales Order < 1 and On P.O. > 1). Use On Hand will show In Stock (if On Hand > 0), Out of Stock (if On Hand < 1), and On Order (if On Hand < 1 and On P.O. > 1). Include buildable assemblies will show the number of assemblies that are built and/or can be built based on the availability of the individual components.
Managing Out of Stock Items
- Allow ordering of out of stock items lets users order items regardless of their stock status.
- Block ordering of out of stock items (if displaying availability) will grey out the quantity box on items until they are in stock.
- Do not display out of stock items (if displaying availability) will hide items from the form until they are in stock.
Minimum Quantity
Minimum quantity does not apply to price lists. This is a global setting for this order form. Setting a value here will require that for each item ordered, the quantity ordered must be greater than or equal to this number. Per-item validation is available on the Items tab of the order form editor.
Quantity Multiple
Quantity multiple does not apply to price lists.This is a global setting for this order form. Setting a value here will require that for each item ordered, the quantity ordered must be a multiple of this number. Per-item validation is available on the Items tab of the order form editor.
Minimum Subtotal
Minimum subtotal does not apply to price lists. Setting a dollar value here will require that the order’s subtotal must be greater than or equal to this amount. Per-item validation is available on the Items tab of the order form editor.
Once you have made your selections, click Save Settings. At this point, you will be able to work with the other tabs on the Order Form/Price List editor.
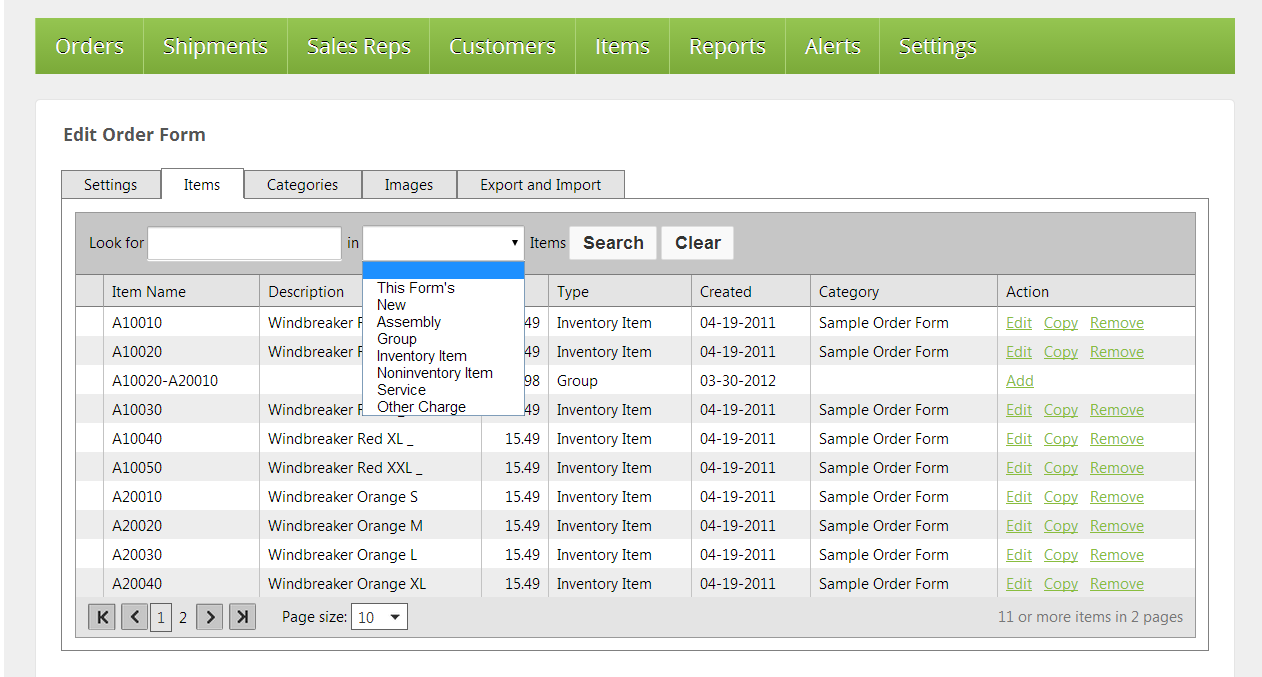
ITEMS TAB
From this screen, you can see which items have been selected to be on the list or form. You can adjust the number of items that are displayed by setting the Page Size to 10, 20, or 50 at the bottom of the page. The columns displayed are defined here. To add, edit, or remove an item on an existing price list or order form, see Edit an Item on a Price List or Order Form.
Item Name
This is the item’s Name/Number as it appears in QuickBooks.
Description
This is the item’s Sales Description as it appears in QuickBooks. You can override the description by clicking the Add or Edit links in the Action column.
Price
This is the item’s Sale Price as it appears in QuickBooks. You can override the Sale Price by clicking the Add or Edit links in the Action column.
Type
This is the item’s Type as it appears in QuickBooks. The following QuickBooks item types can be displayed on lists and forms: Inventory, Non-Inventory, Assembly, Service, Other, and Group items.
Created
This is the date that the item was created in QuickBooks. You can easily find items recently added to QuickBooks by typing Look for “Blank” in “New” and clicking Search.
Category
This column displays categories that have been created in Now Commerce for this list or form. You can change the category by clicking the Add or Edit links in the Action column.
Action
- Add will add the item to this list or form. See Edit an Item on a Price List or Order Form.
- Edit will open up additional settings for the item. See Edit an Item on a Price List or Order Form.
- Copy will duplicate the item, allowing you to display it more than once on this list or form.
- Remove will remove the item from this list or form.
Edit List or Form Items Tab
Look for Items
Look for Items is a search tool/filter. To search for an item, type all or part of the item’s name or description in the “Look for _______” box and click Search. Click Clear to reset the search.
You can also filter the results by leaving the “Look for _______” box blank or by typing all or part of the item’s name or description in the “Look for _______” and using the “in _______” box filter selections and clicking Search. The filter selections are defined here.
- This Form’s will return matching items that have already been added to this form.
- New will return matching items based on their creation date in QuickBooks, with the most recently added items on top.
- Assembly will return matching Assembly items only.
- Group will return matching Group items only.
- Inventory Item will return matching Inventory items only.
- Noninventory Item will return matching Non-inventory items only.
- Service will return matching Service items only.
- Other Charge will return matching Other Charge items only.
When you first create a list or form, a category with the same name will be created. This category will contain all of the items selected to be on the form. Select a category to display its items. Drag and drop items into other categories. Drag and drop categories to reorganize them.
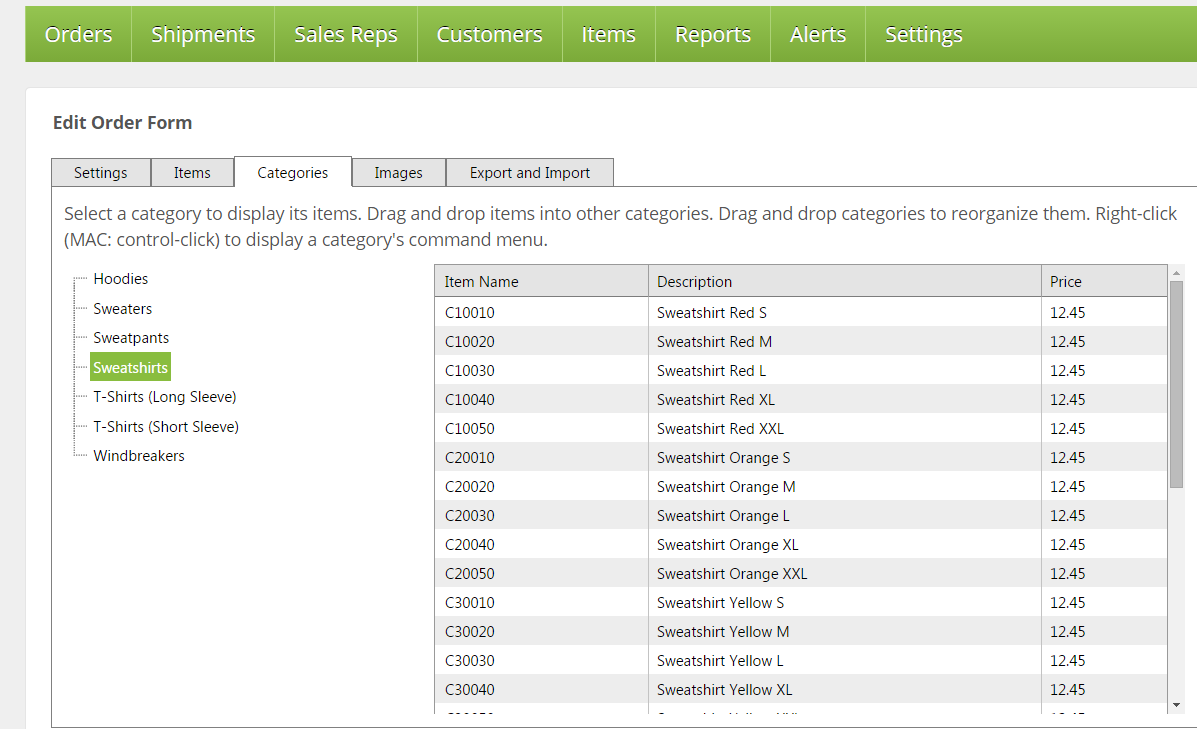
Right-click (MAC: control-click) to create new categories or display a category’s command menu.
Add Category
Add Category will create a new category directly below the current category. You can drag and drop the category to a different location or sub-category location.
Rename Category
Rename Category lets you rename the selected category.
Delete Category
Delete Category will delete the selected category. In order to delete a category, the category must be empty.
Sort Items by Name/Number
Sort Items by Name/Number will sort all items in the category in ascending QuickBooks Item Name/Number order.
Sort Items by Full Name/Number
Sort Items by Full Name/Number will sort all items in the category in ascending QuickBooks Item Full Name/Number order.
Sort Items by Description
Sort Items by Description will sort all items in the category in ascending QuickBooks Description order.
IMAGES TAB
The Images tab allows you to bulk upload images to be used on your lists or forms.
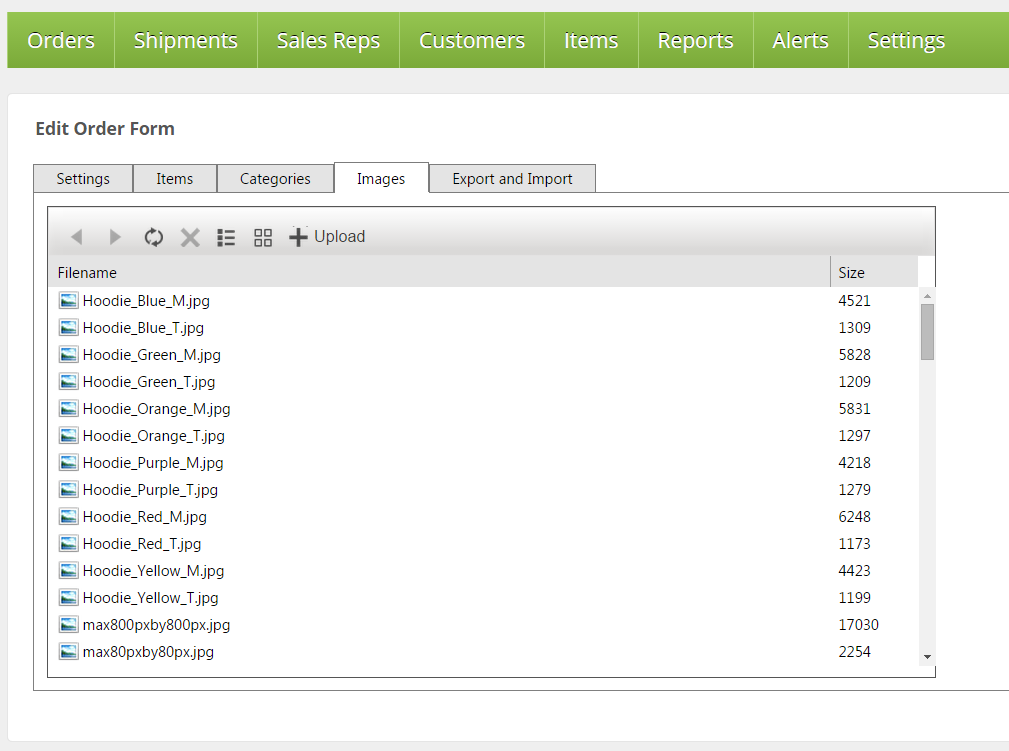
Each item can support up to two images. Click Upload to import images.
A Standard Image (pop up). File can be in PNG, JPEG, or GIF format. Size limit is 200KB and the dimensions should be no larger than 800px by 800px.
A Thumbnail Image. File can be in PNG, JPEG, or GIF format. Size limit is 200KB and the dimensions should be no larger than 80px by 80px.
Once you have uploaded the images, use the Items tab or the Export and Import tab to connect the images to their corresponding items.
EXPORT AND IMPORT TAB
The Export and Import tab allows you to work with a list or form offline in Excel.
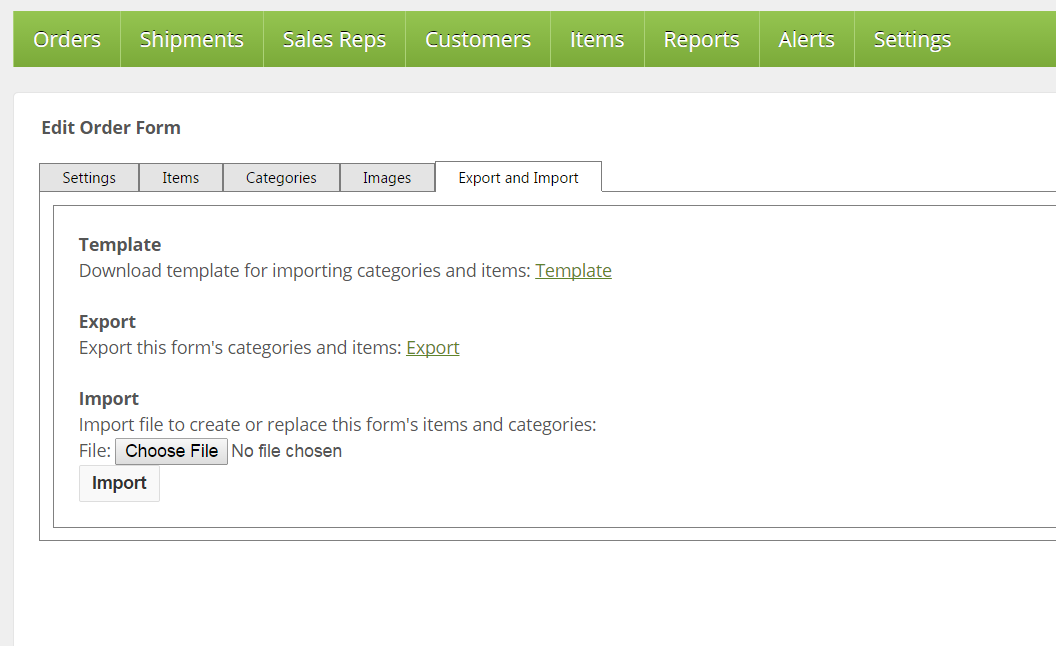
Template
Click Template to download a blank template for creating a new list or form.
Export
Click Export to download this form’s current items and categories.
Import
Choose a file and click Import to create or replace this form’s current items and categories, if any.
The template columns are defined here.
Category1Title
Required. Define at least one item category. If you don’t need categories, create a category called “Order Form” or some other generic name.
Category2Title – Category6Title
Optional. These columns can be used to create up to 5 optional sub-categories.
ItemNameNumber
Required. Each value must match a QuickBooks Item Name/Number.
AlternateDescription
Optional. A value here will be displayed instead of the item’s QuickBooks description on the list or form.
ImageName
Optional. Standard Image (pop up). Must match a unique filename that has been (or will be) uploaded to the Now Commerce system. File can be in PNG, JPEG, or GIF format. Size limit is 200KB and the dimensions should be no larger than 800px by 800px.
ThumbnailName
Optional. Thumbnail Image. Must match a unique filename that has been (or will be) uploaded to the Now Commerce system. File can be in PNG, JPEG, or GIF format. Size limit is 200KB and the dimensions should be no larger than 80px by 80px.
PriceOverride
Optional. The price override on forms overrides the QuickBooks item price. When pricing is displayed for customers with a QuickBooks price level assigned, the price override will be affected.
- If the customer does not have a QuickBooks price level, the override price replaces the QuickBooks item price.
- If the customer has a QuickBooks fixed percentage price level, the override price replaces the QuickBooks item price, then the fixed percentage discount is calculated using the override price.
- If the customer has a QuickBooks per-item price level, the per-item price level price is displayed if the item has a price in the “Custom Price” column on the per-item price level. If the item does not have a price in the “Custom Price” column on the per-item price level, the override price replaces the QuickBooks item price.
MinQuantity
Optional. This item’s quantity must be greater than or equal to the value used here.
MaxQuantity
Optional. This item’s quantity must be less than or equal to the value used here.
QuantityMultiple
Optional. This item’s quantity must be a multiple of the value used here.
